Saturday, June 23, 2018

A Guide to Curing and Storing Garlic

A Guide to Curing and Storing Garlic

You waited seven, maybe nine months, for all that homegrown garlic to finish growing. Now that you've dug it all up, you want to savor it for as long as possible until the next garlic crop is ready.

This is when curing becomes your friend.

Curing is the process of letting your garlic dry down in preparation for long-term storage. Curing and storing garlic allows you to enjoy the flavor of your summer harvest well into winter… and one of my favorite things about garlic is that it still stays fresh long after it's been plucked from the ground. No pickling, no canning. Just a simple head of garlic that looks and tastes the same as the day you pulled it.

Garlic that you want to eat right away can be used right away, straight from the garden.

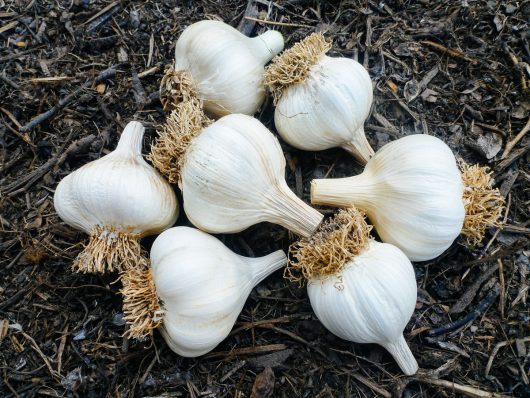
Garlic that you want to cure should be moved to a dry, shady, airy place once they're harvested — this can be under a tree, on a covered porch, or in a well-ventilated garage.

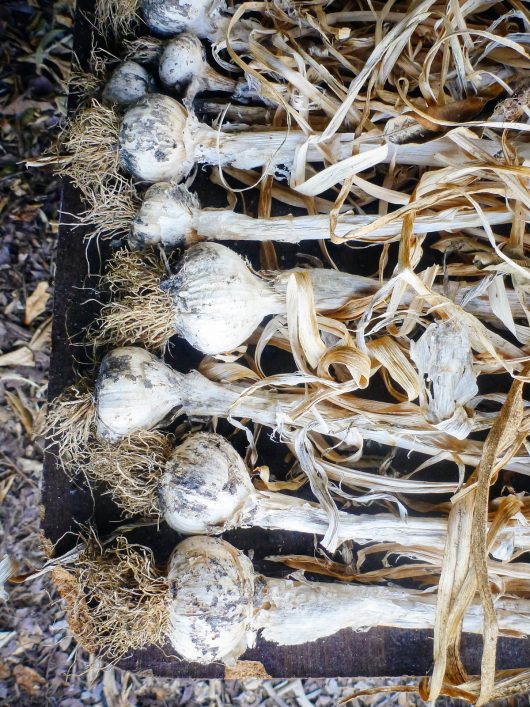
Lay the bulbs out one by one to provide good air circulation. Garlic is susceptible to sunburn (it can literally cook under the sun, which deteriorates the flavor), so you want to minimize the amount of direct sunlight it gets during the curing process.

No need to clean off all that dirt for now — you'll tidy them up when you trim them. Don't wash your garlic either. After all, the point is to dry them out!

Garlic harvest being cured under a shady tree

Garlic harvest being dried in preparation for storage

You can also gather the garlic into bunches, tie them up, and hang them from their stems. If you're feeling crafty,  you can even braid the stems, just like the beautiful ones you see in Italian restaurants.

Braiding only works with nimble softneck garlics, and I find it helps to remove the scraggly bottom leaves first. The garlic is braided while some of the leaves are still green and pliable, and hung to dry in a shady spot.

Braided garlic

Do not remove the leaves while the garlic is curing. The bulb continues to draw energy from the leaves and roots until all that moisture evaporates. Keeping the leaves intact also helps to prevent fungi or other lurking garden contaminants from spoiling the garlic before it's fully cured.

After a month (or possibly up to two months, if the weather has been rainy or humid), the roots should look shriveled and feel stiff like a bottle brush, and the leaves should be completely brown and dried.

Shriveled roots on cured garlic

Brown and dried leaves on cured garlic

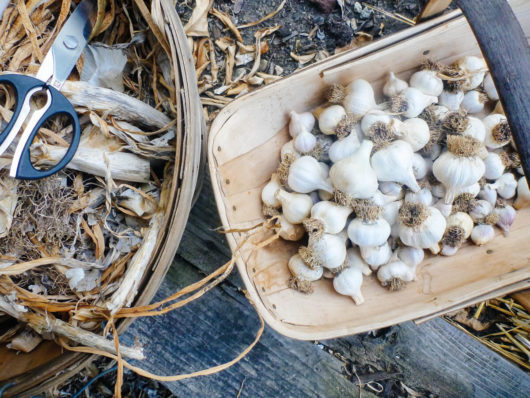
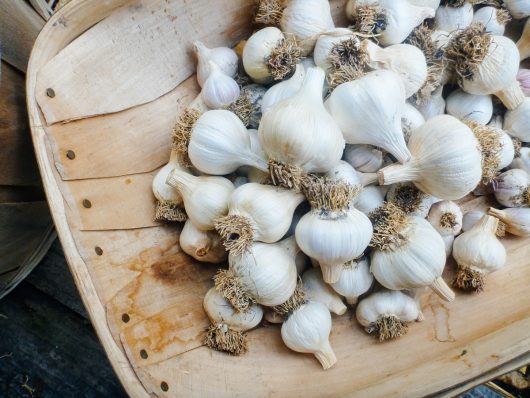
To clean up the garlic for storage, trim the roots and leaves (with a pair of scissors or pruners) to 1/4 inch or 1/2 inch. More dirt will dislodge and a couple extra layers of bulb wrappers may flake off, giving you a nice and neatly packaged bulb. Remember not to remove too many wrappers in case you expose the cloves.

Cured, cleaned and trimmed garlic

Garden Scissors | Wooden Basket | Garden Trug

Cured and trimmed garlic ready for long-term storage

(If you braided your garlic, you saved yourself an extra step and can simply snip a bulb off the braid when you need it.)

Set aside your most beautiful heads of garlic with the biggest cloves to use as seed garlic the following season.

Save the best and biggest garlic bulbs to use as seed garlic

Beautiful garlic bulbs set aside for seed garlic

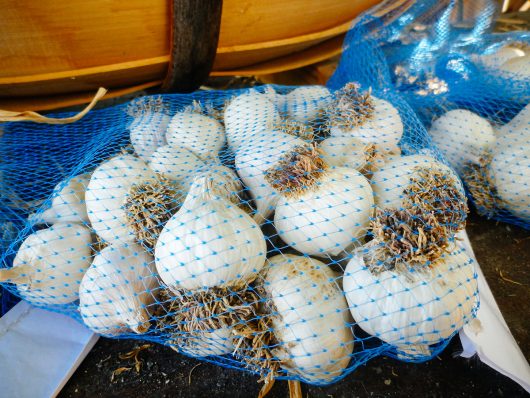
Stash it all in mesh bags, woven baskets, old terracotta pots, brown paper bags, or even cardboard beer/soda cases — as long as the container is breathable and the environment stays dry.

I have even heard of people storing garlic in old pantyhose by hanging it from the ceiling, putting a knot between each garlic head, and scissoring off a knot when needed — but really, who has pantyhose laying around these days?!

Garlic stored in mesh nylon produce bags for proper ventilation in storage

Garlic sorted and stored in nylon mesh bags

Garden Trug | Mesh Nylon Bags

Once properly cured, garlic can store for several months. In general, Silverskins and Creoles are the longest-storing garlic (sometimes keeping up to a full year), followed by Porcelains, Artichokes, Purple Stripes, Rocamboles, and lastly, Asiatics and Turbans, which have the shortest shelf life (average of five months under the most optimal conditions).

Temperature, humidity and ventilation all play key roles in determining how well your garlic will store. A "cool, dark place" is the usual recommendation, and it doesn't get any simpler than a spare cupboard or closet shelf at room temperature.

If you want to get technical, the ideal storage condition is between 55°F and 65°F, around 60 percent humidity, with good air circulation. Garlic tends to sprout at colder temps (thus, no refrigerators!) and dry out in warmer temps.

Lower humidity may cause dehydration (especially in Rocamboles, which are more finicky than other varieties), while higher humidity may bring in fungus and mold. Light is not a factor in storage, as long as you keep your garlic away from direct sun.

All that said, there is no exact science to storing garlic and I like to keep it simple. I save and reuse nylon mesh bags (the kind that potatoes and onions come in), sort my garlic into them, and hang my harvest in a storage room.

Garlic stored and hung in nylon mesh bags

If you're lucky, you'll be breaking out fresh cloves in winter and perhaps even through the following spring!

Gardening Sources

Turn on your JavaScript to view content
Cornucopia Wooden Half Bushel Baskets | Esschert Design Sussex Trugs | Okatsune Garden Scissors | Glotoch Express Reusable Mesh Nylon Produce Bags

This post updated from an article that originally appeared on July 14, 2011.

The post A Guide to Curing and Storing Garlic appeared first on Garden Betty.


Check Out My Books!

The New Camp Cookbook offers over 100 modern recipes for campers, road trippers, and adventurers, plus practical tips for building a cooking fire, setting up a camp kitchen, and stocking an outdoor pantry. As seen in Time Magazine, Outside Magazine, and Food & Wine!
The CSA Cookbook features over 100 no-waste recipes for using up the produce in your Community Supported Agriculture box, farmers' market basket, or backyard bounty. Learn how to cook all the unconventional parts of vegetables you thought you couldn't eat, like carrot greens and squash leaves!


from Garden Betty https://ift.tt/2tv8R1n

Wednesday, June 20, 2018

Seaside by Mosaic in Tsawwassen

Seaside by Mosaic is a new collection of 2, 3 and 4 bedroom Coastal Townhomes located in Sunny Tsawwassen. Seaside is located just five minutes from the beach and steps from the golf course. A short drive to Tsawwassen Mills shopping center ensures you will always have everything you need.

The post Seaside by Mosaic in Tsawwassen appeared first on Vancouver New Condos.


from Buildings – Vancouver New Condos https://ift.tt/2tnjD9X

Tuesday, June 19, 2018

It’s Almost Summer! Here’s An Update on the New Garden

It's Almost Summer! Here's An Update on the New Garden

I'm going into my fourth season in Central Oregon soon, but only my first as a gardener. (Side note: Whoa, eight months already? Where has all that time gone?!)

If you've been following me since my move from Los Angeles to Bend last fall, you might remember that we're currently in a rental home while we continue to explore all the neighborhoods here and settle into our new town. (Which, by the way, has been an absolute blast. You can see some of our local adventures on my Instagram, and I'll be following up this post to answer some of the most frequently asked questions I've received since the move.)

We were fortunate to find a lovely property on a sprawling half acre to rent, but the fact that our lease ends in a year means we haven't done much by way of building a garden. We won't be adding raised beds or erecting deer fences, or seeding wildflowers or planting bulbs. All of the work in the yard has revolved around our chickens, but even their enclosure is temporary.

Nonetheless, I couldn't let this beautiful spring season pass without planting something, so I decided to start an edible container garden on the second-story deck of our house. It's a small deck (about 15 feet x 15 feet) and the container garden even smaller (just a few planters in the corners), so it's far from the garden I'm used to having — but something is better than nothing!

Planting a new container garden

(How cute are my little helpers?)

Having the garden on the deck meant it would be protected from deer, voles, yellow-bellied marmots, and other pests that are new to me in this region. (I actually think yellow-bellied marmots are adorable and I kind of wish they hung around our yard; the only time I've seen them was when I climbed to the top of Half Dome in Yosemite a few years back.)

Limiting the size of my garden meant I could focus on the number-one challenge of growing in this climate (USDA Hardiness Zone 6b), which is year-round frost. I know that 6b sounds relatively mild, but we're in a high desert with a notoriously unpredictable microclimate.

Though our frost-free growing season is said to be around 80 days, frost can happen at any time of year, even in the peak of summer. It's not unusual for daytime highs to reach 77°F and then drop drastically to 32°F at night. (In fact, it just happened last week.)

I've been learning, testing, and improvising various methods of frost protection that don't involve a greenhouse, and happy to report, I haven't lost a seedling or starter plant yet!

Thanks to my partners at Root Pouch, Gardener's Supply Company, and GreenStalk Garden, I've also been experimenting with new ways of growing vegetables in containers to find the easiest and most efficient solution for other small-space gardeners. All of this will be shared in more detail at the end of the season, but in the meantime, here's what it looks like on the deck.

This season, I have three indeterminate tomato plants growing in 20-gallon Root Pouch containers. They've been wrapped in those red tomato teepees (essentially water-filled tubes that collect heat during the day and radiate it out at night) since they were only 10 inches tall, and have been doing amazing with no other type of frost protection.

Tomatoes growing in fabric pots with plant teepees for frost protection

Despite some scary lows in recent weeks, I've got flowers and even tomatoes on the vine! I plan to remove the teepees the first week of July (as the plants are starting to outgrow them), and will be using traditional frost blankets for the rest of summer, as needed.

Tomato blossoms

Immature tomatoes on the vine

Two of the tomato plants are using these stacking tomato ladders from Gardener's Supply Company for support, while one is using their extra tall tomato cage. All of these plant supports are extendable, and I'll likely add the second tiers once I remove the teepees. I'll report back on how these tomato supports turn out in a few months — so far, so good.

I have two determinate tomato plants growing in this self-watering Gardener's Revolution tomato growing kit from Gardener's that came complete with potting soil, fertilizer, and built-in supports. (I also added optional casters on the bottom and a cover that protects against wind and cold.)

I was intrigued by the self-advertised efficiency of the system, and if it works well for tomato plants, I might transition it into a planter for fava beans or peas in the fall (as the supports can extend several feet high).

Gardener's Revolution Classic Tomato Garden Kit from Gardener's Supply Company

Next to it, I have a self-drip stacking tower from GreenStalk Garden. (And by the way, they are offering $10 off any of their tiered systems if you use promo code gardenbetty10 on their site). I'll eventually dedicate a whole post to it (as there's a lot to share about its watering and vertical growing capabilities), but the basic system involves five stackable planters, each with six "pockets" for growing plants. A large reservoir on top allows all the planters to be watered at once with one filling, so you don't have to water every individual pocket.

I added the GreenStalk mover and frost cover to my system, both of which are working very well with a fully loaded tower. The plants are still young (and I just sowed another round of seeds in the pockets this week), but I'm excited to see it in a few months when it's (hopefully) covered in a curtain of green!

Individual planter from GreenStalk Garden vertical planter

Growing in a new GreenStalk Garden vertical garden tower

I currently have strawberries, peppers, bush beans, cucumbers, and summer squash in one tower, and need to transplant basil, shiso, and flowers in the last planter to stack underneath the strawberries. A second tower (placed in the opposite corner where the deck gets partial shade) will have some herbs and leafy greens. (You can see the full list of what I'm growing here.)

Banana pepper plant growing in a vertical planter

It's a small and humble garden, but I'm really enjoying the journey of starting over in a new climate. I'd considered planting a fall garden right after we moved in last October, but I'm so glad I waited. Just living here and learning how I use the space, watching the way the sun moves across our yard, and familiarizing myself with the ups and downs of Central Oregon weather has truly helped the garden survive and even thrive, despite dramatic temperature shifts.

This is, above and beyond, the most practical advice I can offer to anyone in the process of establishing a new garden. Take your time, learn the weather patterns, and exercise ample patience when it comes to starting seeds or hardening off your plants. (That last point, I cannot stress enough… the process of hardening off isn't just for seedlings, it's for any plant that has lived inside a heated home or insulated garage.)

I mean, it's almost July yet still feels like early spring as far as planting goes. I have an all new respect for cold-climate gardeners because anyone who grows in a cold climate is truly committed to the craft. The time and resources it takes to keep just a few plants alive outside makes my previous zone 10b garden look like a walk in the park! (Not knocking 10b at all, as that type of climate came with its own set of unique challenges.)

I'll be back with another update in mid-summer! Meanwhile, you can follow me on Instagram or Facebook to see how the garden progresses these next few weeks.

Gardening Sources

Turn on your JavaScript to view content
Root Pouch Boxer 20-Gallon Pots | Generic Pots Black Premium Plastic 25-Inch Saucer | Kozy Coats Plant Teepees | Gardener's Supply Company Stacking Tomato Ladders | Gardener's Supply Company Heavy Gauge Extra Tall Tomato Cages | Gardener's Supply Company Gardener's Revolution Classic Tomato Garden Kit | Gardener's Supply Company Planter Casters | GreenStalk Garden 5-Tier Vertical Garden Planter | GreenStalk Garden Vertical Planter Mover | Frost Protek Tall Plant Cover

The post It's Almost Summer! Here's An Update on the New Garden appeared first on Garden Betty.


Spring is here! And to help you figure out what to do with all those weird vegetables and parts you thought you couldn't eat, The CSA Cookbook makes an excellent addition to your cooking or gardening library.


from Garden Betty https://ift.tt/2ljlmcM

Friday, June 8, 2018

Broccoli Leaves Are Edible

Broccoli Leaves Are Edible

… As my veggie-loving pug will tell you!

Most people don't realize that broccoli leaves are just as edible as the broccoli head itself. And I can't blame them, since store-bought broccoli comes in a neat little package with only a few tiny and uninspiring leaves stuck to the head.

Unless you grow them yourself, you never see the massive greens that broccoli heads spring from. On my Romanesco broccoli plant (Brassica oleracea 'Romanesco'), which grows larger than your everyday broccoli, the mature leaves span up to 2 feet long with hefty ribs and stems.

Mature broccoli plant

Even though the plant is typically grown for its flower bud (what you commonly know as a head of broccoli, or a floret or crown), the flower is a relatively small part of the crop, and it seems like you wait alllll spring (or fall) for the prize.

(A prize that sometimes never arrives, as anyone who has waited fruitlessly for a bud can attest to!)

A broccoli plant only produces one significant head per life cycle, with occasional secondary sprouts that form in the axils of the leaves. (These side shoots always turn out smaller than the center head — think bite-sized). Knowing that, it seems wasteful to use such a modest portion of the plant when the rest of it is so good.

How good?

Broccoli is considered one of the most nutritious vegetables on the market, providing 100 percent of the daily value of vitamin C in a single cup of chopped broccoli. It contains a full nutritional lineup of B vitamins, potassium, iron, calcium, minerals, and fiber. When compared to the stems, the florets have a higher concentration of protective phytochemicals like beta carotene and sulforaphane (the latter of which has been shown to protect against certain cancers).

But broccoli leaves are their own superfood, with even higher amounts of beta carotene than the florets, as well as vitamin A (that's important for vision and skin health) and phytonutrients that aren't found in the florets or stems.

Broccoli leaves are a nutrient-dense green

Texture- and appearance-wise, broccoli greens are similar to collards, as both plants belong to the mustard (Brassicaceae) family. The leaves may look intimidating, but they're easy to harvest and cook down deliciously. They can be steamed, sauteed, stir-fried, or even grilled.

The greens can be used in place of collards, kale, cabbage, or chard in many recipes, though they have their own distinct flavor — earthy, mildly bitter, and tasting faintly of broccoli. They sweeten up as they cook, and unlike other greens, they won't wilt into nothing as soon as they meet the heat.

Broccoli leaves can be harvested at any stage of the plant's growth cycle

If you grow your own broccoli, you can start to harvest a few of the outer (older) leaves every week once they reach 4 to 6 inches long. After the plant buds, you can harvest the head but continue to pick the leaves until you can no longer keep up… seriously! Broccoli is an incredible cut-and-come-again crop, and new leaves remain tender even when the rest of the plant is getting tall and unwieldy.

When I lived in Southern California, I could keep my broccoli growing year-round in the mild coastal climate. These second-year plants were still thriving despite having all the crowns harvested (what seemed like) ages ago, and on some of the plants, I'd stripped them clean of leaves to cook with! Let's just say… we got our fill and didn't grow any broccoli the following year.

Second-year broccoli plants still thriving

Very mature broccoli plant stripped of its leaves for cooking

If you pick the younger leaves off the plant, they're tender enough to toss raw into a salad or blend into a green smoothie. Medium leaves are the perfect size and thickness to stuff with veggies and meat, à la cabbage rolls. (I even have a recipe for broccoli green and baked falafel wraps in my book, The CSA Cookbook, which takes a top-to-tail, no-waste approach to cooking.) Large leaves work best in braises, soups, and stews, where they'll stand up to a long simmer and soak up loads of rich flavor.

I typically don't eat the stems on larger leaves, since I find them too fibrous. But if you harvest the central stalk before it grows too woody, you can peel the tough outer skin to reveal a crunchy sweetness underneath.

Still think it's weird or unsafe to eat broccoli leaves? It's not — broccoli raab, or rapini, is a fairly common vegetable that's grown for its asparagus-like shoots and leaves. Another variety, Spigariello, is a non-heading Italian broccoli grown for its leaves. You may have already eaten it and not known it!

It's a shame we don't see broccoli leaves sold in the grocery store — and why don't we? Perhaps we're so accustomed to the usual cast of characters in the leafy greens aisle that we only value broccoli for the crown, in the same way we favor carrot roots over carrot tops (which, by the way, are another misunderstood and highly underused green).

Considering the amount of water and resources it takes to grow this nutrient-dense (and space-hogging) plant, it feels like such a waste for commercial farmers to harvest the heads but discard the perfectly good leaves — which gives all the more reason to grow your own. (Or make friends with someone who does!)

My pug enjoying broccoli leaves from the garden

(In loving memory of my omnivorous pug, Bebe, who passed away in June 2017 after a long and adventurous life.)

This post updated from an article that originally appeared on April 29, 2012.

The post Broccoli Leaves Are Edible appeared first on Garden Betty.


Spring is here! And to help you figure out what to do with all those weird vegetables and parts you thought you couldn't eat, The CSA Cookbook makes an excellent addition to your cooking or gardening library.


from Garden Betty https://ift.tt/2sTtP9M

OVATION by Domus Homes in New Westminster

OVATION by Domus Homes is a new 31 storey highrise condo development located in Downtown New Westminster. Paying homage to New Westminster's influential arts and culture scene and deep-rooted history of the performing arts, this project will offer 204 1-,2-, and 3 bedroom market condo units. Living in one of the Lower Mainland's most vibrant and walkable neighborhoods means you are steps from shops, restaurants, theatres, transit and the boardwalk to the waterfront Esplanade and park.

The post OVATION by Domus Homes in New Westminster appeared first on Vancouver New Condos.


from Buildings – Vancouver New Condos https://ift.tt/2sSy31I

The Edge in Abbotsford

The Edge by Parcel7 Homes is a new 5 storey condo development located in Downtown Abbotsford. This project will offer 44 1-,2-, and 3- bedroom homes, sizes range from 527 to 1089 square feet. The development is scheduled for completion in 2019. The Edge features striking, modern architecture coupled with spectacular views of the surrounding landscape. Enjoy the convenience of a central location without feeling confined to an urban lifestyle.

The post The Edge in Abbotsford appeared first on Vancouver New Condos.


from Buildings – Vancouver New Condos https://ift.tt/2LA0wRz

The Onyx at Mahogany

The Onyx at Mahogany by Quantum Properties is a new 4 storey condo development located in the heart of Abbotsford. This project will offer 87 stunning modern condos with 10' ceilings. The Onyx at Mahogany is a secure, gated complex just steps from Mill Lake Park, the hospital, and all desired amenities.

The post The Onyx at Mahogany appeared first on Vancouver New Condos.


from Buildings – Vancouver New Condos https://ift.tt/2M9VlIY

Isola by Mortise in Surrey

Isola by Mortise is a new collection of townhomes located in Surrey. This project will offer 57 townhomes, sizes range from 1,140 to 2,000 square feet. In the heart of desirable South Surrey, Isola joins a vibrant yet serene neighborhood that has more than enough possibilities to fit any lifestyle. Surrounded by top schools, natural green spaces, and miles of scenic coastline, here everything is close to home, including all the essentials for life's everyday needs and more.

The post Isola by Mortise in Surrey appeared first on Vancouver New Condos.


from Buildings – Vancouver New Condos https://ift.tt/2LA5bCX